How To Improve Your Results With Triggers
Triggers are ideal to incorporate to your strategy more functions that, for sure, will allow you to improve your results. It is a function that lets you to automatically perform certain actions once a specific event has taken place.
How To Improve Your Results With Triggers
The cryptocurrency market is known for its high levels of volatility, with prices often fluctuating significantly within a short period of time. This can make it difficult for investors to make informed decisions and can lead to uncertainty in the market.

There are a number of factors that can contribute to the volatility of the cryptocurrency market. Economic events, such as changes in interest rates or unemployment rates, can have an impact on the market.
Political events, such as elections or policy changes, can also affect the market. In addition, market speculation and investor sentiment can play a role in the level of volatility in the cryptocurrency market.
What are triggers?
Triggers can be useful tools for managing market volatility in your investment strategy.
For example, you can use triggers to automatically sell assets if their price experiences a significant drop within a certain timeframe, to minimize potential losses.
You can also use triggers to pause buying activity if the market is highly volatile and re-enable it once conditions have stabilized. This can help you to protect your portfolio from potential losses due to market volatility.

How do triggers work?
Triggers are an important part of a trader's arsenal which offers the possibility of trading with the trend, using the right settings according to the right market conditions, and protecting one from crashes or pumps.
To put all this in practice, let’s create a trigger!
This trigger will take profits or cut losses short for all the open positions once the market turns down according to one of our indicators. Let’s do it step by step.
Click on Config, then Triggers and now you are set to start creating it. You can name it and enable it so it will be ready to be used as soon as you have finished it.
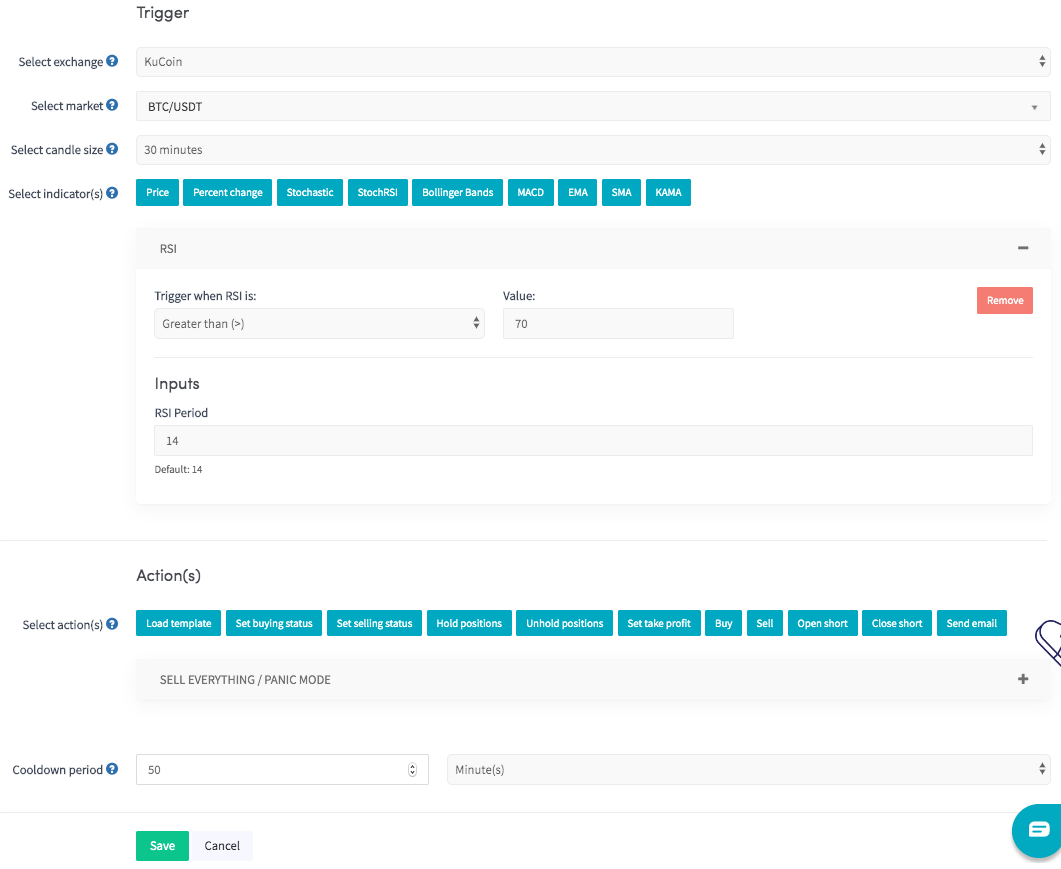
Next, the trigger’s configuration. Select the exchange and market of the trigger. They don’t need to be the ones that you selected in your Baseconfig, you can choose whatever exchange and market you would like. In this example, we’ve chosen KuCoin BTC/USDT.
In this step, you will select the trigger or event that needs to take place in order to execute the action that you have chosen (next step). Here you need to fill two fields: candle size and indicator. As indicator I will select Relative Strength Index (RSI) greater than 70 and candle size 30 mins. Therefore, every time that the RSI will be higher than 70, the trigger will execute the action that I will specify in the next step.
Action(s). Time to select what will happen once the RSI is greater than 70 with 30 mins candles. As we previously said, we want to sell all the open positions. One of the actions that could be useful for this purpose is “Sell everything/Panic mode”. This action will set sell orders for all the positions you have currently open, then leaving no open positions and taking.
Last but not least, the cooldown period. It determines the amount of time in which the trigger will not activate again. That is, even though the trigger RSI is above 70, if it is within the cooldown period, it won’t activate the action. In the example, that you can see below, we have put 50 minutes of cooldown period.

If you have been following these steps, congratulations! You have created your first trigger. It is the perfect function to complement your strategy. By continuously checking your condition(s), it will determine when to execute the action. Do not hesitate to get your triggers ready for better automation and performance of your trading bot!
Create your trigger today, customize it as you see fit, and take your trading to the next level with Cryptohopper!
Click here to create an account in less than 1 minute and start trading automatically!

