
Branded as Global Digital Asset Exchange (GDAX) in 2016 and renamed Coinbase Pro in 2018, Coinbase Pro is a professional asset trading platform launched and owned by the leading exchange broker Coinbase.
Coinbase Pro accepts funding through bank transfers, wire transfers and cryptocurrency deposits.
If you have already registered on Coinbase and verified the account, assets can be transferred instantaneously without fees. Due to its fairly simple user interface, Coinbase Pro is best suited for investors, who are primarily interested in basic trading features.
Momentarily, Coinbase Pro cryptocurrency trading is limited to Bitcoin, Ethereum and Litecoin.
Creating your API key
In order to connect your bot to Coinbase Pro, you need an API key.
Think of an API key as a bridge between Cryptohopper and the exchange, which allows your bot to do things like place automated orders and read your balance for its calculations.
**Step one.**Go to the exchange website, and create an account if you haven't already.
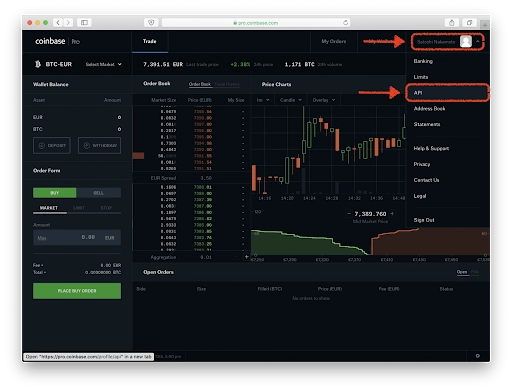
**Step two.**After you have logged in successfully, click on your name in the top right corner, and click "API".
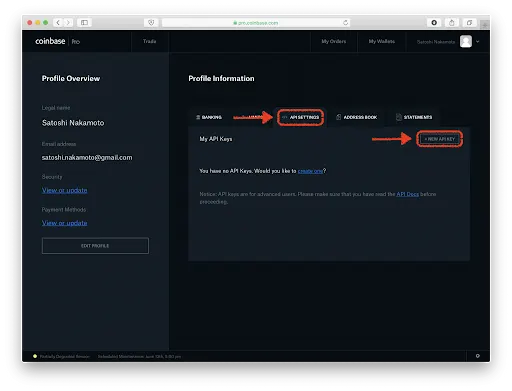
**Step three.**Create the API key.
Go to the tab labeled "API Setting". From there on you can create a new API.
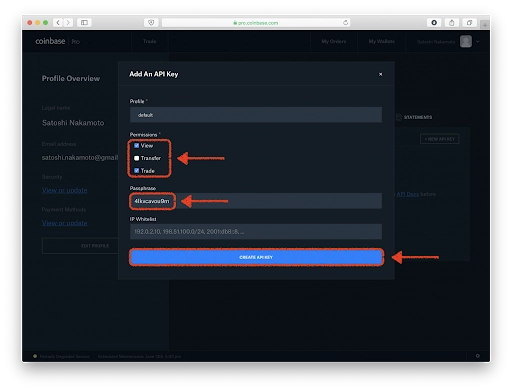
**Step four.**API key settings.
Coinbase PRO offers three settings, "View", "Transfer", and "Trade". Cryptohopper needs to be able to view and trade. Transferring won't benefit Cryptohopper and is a security hazard, so do not enable “Transfer”.
You will also need to create a passphrase as an added security measure. Pick something memorable but not overly-simple. A good one would be "CHApi2020!" for example, while a bad one would be "passphrase".
Keep the passphrase in mind, you will need to copy it onto Cryptohopper later!
IP whitelisting should be set at unrestricted. Because Cryptohopper is cloud-based, we use over 200 IPs!
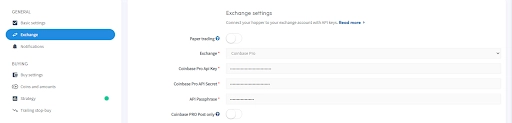
**Step five.**Add the API to Cryptohopper.
Navigate to your Cryptohopper account and find the baseconfig. From there, click on the tab labeled "exchange".
Select your exchange, fill in your API key, and the passphrase you made in the previous step, and you are done!
Give the trading bot a moment to link everything and your balance should be loaded.
Unable to see your exchange balance?
There are a few things that could prevent your hopper from synchronizing the funds of your exchange. In most cases, it’s because the browser that you use has "auto-fill" enabled. This means that the browser fills in certain text fields themselves. There are a few things you can do:
- Disable autofill.
- Use incognito mode of your browser.
- Use a browser that you don't use often.
- Disable password managers for Cryptohopper.
- Disable browser extensions that can change text fields
And you're done! Check our community forum where users share their trading bot settings.
If you want more information about this subject, watch our Cryptohopper Academy video about this subject.
Coinbase Pro minimum trade amounts
Click here to check the minimum trade amounts on Coinbase Pro.
Coinbase Pro status
Do you experience issues with trading on Coinbase Pro? Click here to check Coinbase Pro's exchange status.


_webp.webp)
_webp.webp)